

Step-by-Step guide to Eliq Data Management API
How to use the Data Management API to load and manage data, which can be accessed through the Insights API.
In this guide we’ll walk through how to use the Data Management API to load data to Eliq. The data can later be retrieved through the Insights API and presented to end users.
The goal is to make you familiar with most our Data Management endpoints and give you a clear idea of how to make good use of them so that you move forward as fast as possible in your project.
The Eliq Model is structured around a User, Location, Home Profile, Meter, Energy Data and Price Data, as described in Eliq’s view of the world. The endpoints of the Data Management API are used to manage all the parts of this model.

The Data Management API is used for getting data into Eliq, and the Insights API is used to get data out Eliq and present it to users.
API credentials
To access Eliq APIs you’ll need to use the following URLs and API Keys which will be provided to you by Eliq:
- client_secret
- client_id
- baseUrl
Postman
In this guide we’ll show you how to use our APIs with Postman. Click here to download Postman.
Configuring Postman
Our APIs are available on our Developer Portal where they can be downloaded and be imported into Postman. Here are direct links to the API collections for Eliq Data Management API and Eliq Auth API.
When you first open Postman this is what you’ll see. We’ll begin by importing both of the collections we just downloaded by clicking on “Import”.

This window will pop-up and you simply choose both of the files you want to import.

You’ll then be shown this window in which you’ll turn on “Copy collection to workspace”, and press “Import”.

You’ll now see both of these collections on the left side.

Setting your variables for the Eliq Data Management API
Click on the Eliq Data Management collection on the left side and move to the “Variables” tab. Create the following variables:
- baseUrl – this will be the URL to the Eliq Data Management API.
- userId – a reference to your user, e.g. one generated using Free Online GUID Generator
- locationId – a reference to the location, e.g. location1
- meterId – a reference to the meter, e.g. meter1
- bearerToken – this will be user to authenticate with Eliq and we’ll go back here and add this soon.
After the variables are filled in press save.
(“Initial Value” here isn’t necessary to fill in as the “Current Value” is what will be used when you make calls.)

We’ll now move on to setting up the variables for the Eliq Auth API and generate the bearer token.
Generate a token
Before using the Eliq Auth API to generate a token, you need to set up the request body as shown in the example provided in the Auth API documentation.
- grant_type – ‘client_credentials’
- client_id – this is for your specific environment and will be shared by Eliq
- client_secret – this is for your specific environment and will be shared by Eliq

Press send and you should get a response like below. The bearer token we need is the long string “access_token”. We’ll copy this (without quotation marks) to use for our Eliq Data Management API variable.

(The token is valid for 3600 seconds (60 minutes). If you start receiving 400 errors while using the APIs, it may indicate that your token has expired. More details can be found in Authentication for Eliq.)
Now go back to the variables for the Eliq Data Management API and paste the long string as “current value” for the “bearerToken” variable. It should now look like below:

We have now configured everything and we’re ready to start making calls to the Eliq Data Management API!
Create a user
As follows from the Eliq Model, everything is starting with a User so let’s start out by creating one.
Go to the Collections to your left in Postman and find “PUT Create or update a user” and fill in the Path Variables like below:

For the Body, change “id” to “{{userId}} before pressing send.

You’ll now get a response that looks very similar to what you sent. The main difference is that an “eliq_id” has been assigned to your user, and the time when the user was created is added.

To return a user that you have created, you can use the “GET User” call. For this call you only need to change the value for the Path Variable to “{{userId}}” and press send. You’ll now see the same information returned as in the previous step.

You can also delete the user in the same way using the “DEL Delete user” call, but we’ll skip that step now since we will be using this user for the rest of the guide.
Create a location
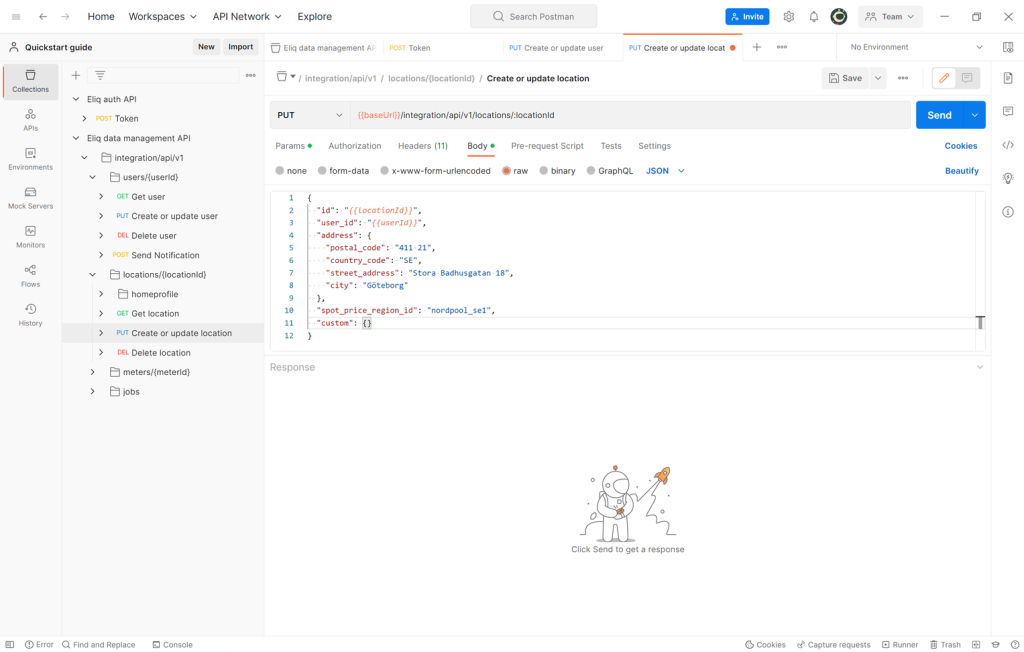
We’ll now use “PUT Create or update location” endpoint to create a location, and the following steps will mimic what we did when we created a user. Fill in the “Path Variable” on the “Params” tab like below:

Move to the “Body” tab and fill in id and “user_id” like below.

Press send and you’ll get the following result.

For each location created (like for users) an “eliq_id” and a time stamp for when the location was created will be added.
Add a location profile
For each location you can create a location profile which will be used by Eliq Insights APIs. To do this we’ll use the “Create or update location profile” endpoint. On the “Params” tab, fill in “Path Variable” value to “{{locationId}}”.

Go to the “Body” tab. There is already a Key to a House Property filled in here. Normally, a Location Profile will have many more properties that defines the home. You can read more about the location profile here. We’ll keep it like this for now.

We’ll now press send and the return will look exactly like the body we sent.

Create a meter
Find the “PUT Create or update meter” endpoint in the list to the left and fill it in like below.

Move to the body tab and fill in below. Please note that your “model” might have a different value than in this example below. If you get “Error 400 Bad Request” and it says “Invalid meter model”, please reach out to your contact at Eliq to get the right meter model to use.

Press send and you should get a response like below.

Add a price formula
Pricing formulas are used to convert kWh to a currency so you can get both kWh and currencies back from the Eliq Insights API.
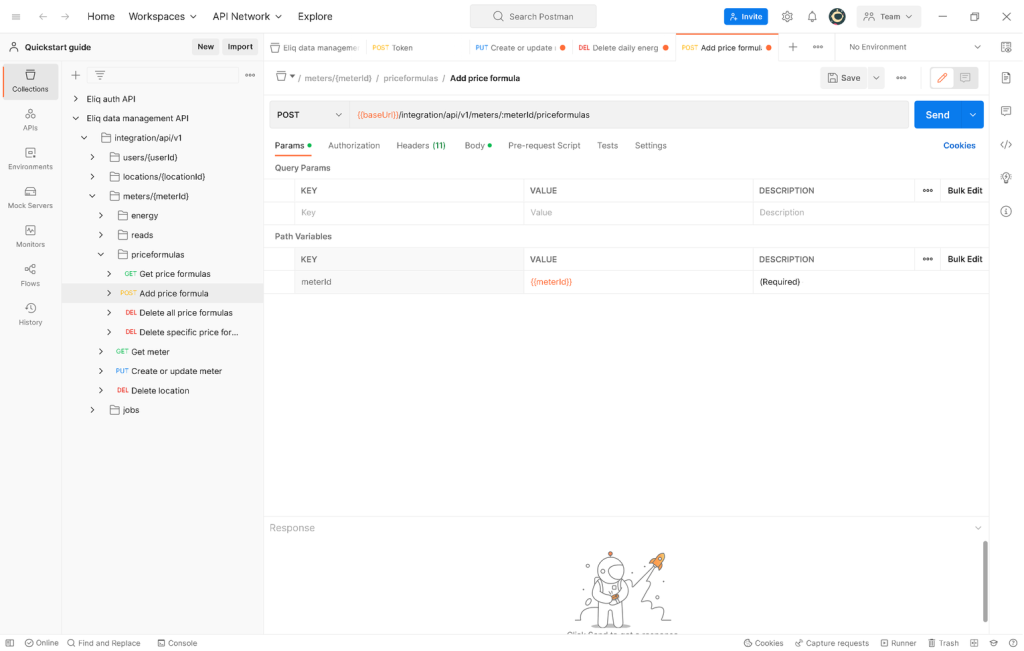
Price formulas are added to a meter by using the “POST price formulas” endpoint. As you are adding this price formula for the meter in question, please change the “Path Variable” value to “{{meterId}}” like below.

The body for the call is already populated with a basic pricing formula consisting on two parts: a standing charge per day and a fixed unit rate. Line 2,3,4 sets the currency and between what dates this pricing formula will be valid. You may have multiple pricing formulas for the same meter, but for separate date periods.
Line 6-13 describes the “standing charge” of 0.25 GBP per day, and line 14-23 describes a fixed unit rate of 0.1 GBP per kWh. Let’s keep it as it is for our example and press send.

The return should be the body you posted. The pricing formula we used in this example is just one of many alternative pricing formulas supported by Eliq. We have an article on the price formula model if you want to learn more.
Add energy data
Eliq can work with high resolution data, but we’ll focus on the “GET Day” endpoint for daily values. Open the “POST Add or daily update energy” endpoint and change the “Path Variable” value to “{{meterid}} to upload the daily values to the meter we just created.

The body you’ll see will look like below. Line 3 will specify the date for which this data is related to, line 4 is the total consumption for this day. There is also an option to fill in if this data is estimated. Estimated data won’t be treated the same by Eliq’s algorithms, but won’t make a difference in other ways, i.e. the data will still be shown to end users if you later use the “GET daily energy” endpoint or any of the endpoints in the Insights API.
Line 6-15 is an example of how you can fill in that your values should be assigned to different registers, which is typically used if you have multiple measuring points during the day. This can later be used for more advanced pricing formulas in which there are different prices for different times of the day (e.g. day and night). This is however not mandatory and we’ll remove it for now.

Please fill it in like this instead, which will upload data for three days at once.
[
  {
    "date": "2020-01-02",
    "energy_wh": 7000,
    "is_estimated": false
  },
   {
    "date": "2020-01-03",
    "energy_wh": 7300,
    "is_estimated": false
  },
   {
    "date": "2020-01-04",
    "energy_wh": 7500,
    "is_estimated": false
  }
]
It should look like this and we’ll press send. You should get a “204 No Content” reply like below.
To retrieve this data we can use the “GET daily energy” endpoint. Once again we’ll change the “Path Variable” value to “{{meterid}}” to retrieve the data for the meter we assign the data to. We’ll also have to fill in the dates between which we want to retrieve data. Set the value for “from” to “2020-01-02” as that is the first day we put in data for, and as the “to” key is exclusive we need to set value to “2020-01-05”.

When you press send you should get the result like below:

